Showing posts with label Tutorial. Show all posts

Monday, March 5, 2018

GRANDMOTHER'S FLOWER GARDEN (Hexies revisited)

My sweet blogging friends!  have we had some weather in Texas this winter.  Some of the coldest and wettest I've experienced.  But today has been very pleasant, in the upper 60's and sunny!  I love sunny days.  I am appreciating the sun more right now because for about 3 weeks, we have not seen any--only rainy and wet, wet, wet!
This leads me to today's post topic~~~~~~~~


English Paper Piecing---A method of using paper to stabilize small pieces of fabrics as they are folded and tacked around the paper then sewn together in small groups and then sewn together to accomplish your desired project.  Grandmother's Flower Garden is a pattern that became very popular in the 1930s.  I began mi GMFG as a TV project.  Small pieces of fabrics that would otherwise be discarded can be made use of in this way.  Small flexible card stock is my paper of choice.  The kind you find as an advertisement in a magazine.  Possibly as a magazine subscription card.  Each side of my hexagon shaped template is about 1 inch.
  I searched out a tutorial and finding it, I also found this precious Travel Kit.  I was hooked-- my heart fell in love with this quilt making process, although I have not put one together, I am still just making EPP flowers!
 The tutorial and the pattern is awesome and is the best travel kit I've ever had.   The size is great!  It holds everything needed with room to spare.   The biggest plus is it is absolutely adorable!  At first glance you know what it is for and what is inside.  By using your favorite fabrics, you can make it your own  Mine closes with one of my favorite pearl buttons!

The inside has 3 convenient compartments.  I put my finished hexie flowers in the front pocket and still have two compartments for other supplies. 
The sides are accordion style!!  This is about the best design I've seen!  No matter how much you stuff into this little kit, you can bet it will fit!  Even a small light.

An extra pattern for a delightful little pin cushion is also available.  I made one and attached it to the inside flower.  I can put the pins in sideways and still close my kit.  The magnetic closure is one of my favorite features.  


Here are a few of my sets waiting to be stitched. Picking fabrics for my flowers-----AAAAHHHHH--  I love the fact that all my favorite fabrics from different projects can be used together so that I can be reminded of them all.  I love auditioning centers until I just can't wait to get the flower made to see how precious it looks.  (I know you all think I 'm a little crazy).  


Let me show you my process~~~~~
 I use to use a glue stick to attached my hexie pattern to my fabric, but have resorted to a pin.  It makes taking those papers out so much easier.  I fold the corners right under left going counter clockwise, continuing all the way around, tacking as I go.
 Then I begin whip stitching the hexies together starting with two petals, then add the center.  I use matching thread, but here I have used contrasting thread so that you can see the stitches.  My needle is a straw and I pinch the hexies together as I go so as to keep the sides matched.

 As you are stitching around the center, you will need to travel your needle to another corner.  Start at the corner you ended with to the adjacent corner you need to go to traveling under the fabric being careful not to go through the paper onto the front of the flower.  In above pic see that where I entered and exited from the back of my hexie.
 Sometimes you will need to bend one hexie to get to your stitching point but that is OK!  It seems to me that the more I use my papers the better they work.  They become flexible and have a memory so that they know exactly what to do and when to do it!
When I get through with 4 or 5 hexie flowers, I take the papers out.  Most tutorials tell you to leave the papers in to stitch them together, but I have found that I like taking the papers out so that I
can use them again and I don't have to have so many papers.  After the papers are removed, I take my flowers straight to my ironing board.  I spray them with Magic Sizing and give them a good press.

Aren't they pretty!!


"Therefore I tell you, do not worry about your life, what you will eat or drink; or about your body, what you will wear. Is not life more than food, and the body more than clothes? Look at the birds of the air; they do not sow or reap or store away in barns, and yet your heavenly Father feeds them. Are you not much more valuable than they? Can any one of you by worrying add a single hour to your life?"
– Matthew 6:25-27

Until we meet again!

Molly


Thursday, February 1, 2018

FIRST FINISH OF THE YEAR! (But it's not finished!)

I had some time yesterday to get my first finish of the year but fell short of hand stitching the binding down.  This small quilt wall handing has been pieced for over a year and a half but I have procrastinated because I am afraid of failure.  The quilting is something that I have not had much experience with.  This is about to change.  I decided to try mock hand quilting on my machine.  You probably have tried it before.  You use a regular thread in the bobbin and an invisible thread on the top.  My Janome machine suggests using a stitch called a "sculpture stitch" (#171) and adjusting the tension to a #6.  What happens is the invisible top thread pulls the regular bobbin thread to the top in a fashion that when stitched you find it looks a lot like hand quilting.  I have done it before, but not in a long time and on a very small quilt that was a panel.  The mail problem I had was moving over thick seams of piecing.  I found that sewing very slow is very necessary.
 I layered my backing, batting and quilt top after pressing all until smooth and straight.  Make sure you have no puckers anywhere and pin all together.  The batting and backing will be trimmed after the quilting is complete and the excess backing will be used as the binding.
 I then began my marking.  I used a chalk marker and, of course, a straight edge ruler.
 I used the simplest method quilting lines which was diagonal through the blocks, both directions.  I only marked a line or two at a time as the chalk brushes away easily.  Choose the color of invisible thread that you think will be the most invisible on your quilt.  Funny, but I have a real problem with this thread because it is so invisible.
 Here is a pic of after I marked a few lines of quilting.  I did rub some of it off and had to do it again so you can benefit from my mistakes!  Yay!!
 As you begin to quilt you will start to think it is puckering and will never ever be right again!  But think again.  When all is done, if you have quilting similarly all over the quilt, it will be straight again.  I promise.
 I think you can see in this pic that the top and bottom look good but the middle looks puckered.  That is because it has not been quilted.  Take your blessings where you can fine them!
 In this picture, I hope you can see the hand quilted look.
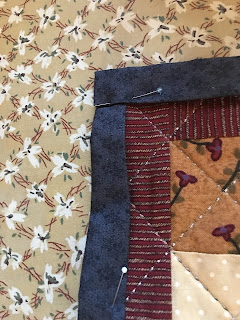
 I actually began working on the binding before I finished the center quilting because I stipple quilted the middle.  I was anxious to see if my idea of bringing the backing around for a binding was going to work.  I folded the backing out of harms way and trimmed the batting to 1/2 inch all the way around.  I then trimmed the backing 1 1/2 inches all the way around.  I them folded the edge of the backing to the edge of the finding and then folded the backing one more time and pinned it in place.
The corner will need to be worked with before you can fold the next side.  After the first fold, you will need to fold back the edge into a triangle sort of.  This makes that edge disappear.
 Press all really good even using a little Magic Sizing or starch.  Fold down and continue pinning.
This pic was taken before I pressed really well---my bad!!

 Here is the semi-finished quilt, ready for binding to be hand stitched.  You would not believe all my computer woes lately.  I got a new Microsoft Surface Book for Christmas, but it is so different from any I have ever had, it is taking me awhile to figure it all out.  This posted before I was finished yesterday so many of you think, "Well, she just cut it off right at the end!  Sorry!  and anther day last week I was trying to post from my phone and a blank posted.  Many of you tried to "read" something and "nothing" was there.  Again, "So Sorry".

Back soon`--  I have a couple BLOCKS OF THE MONTH going that I want to show you.

HAPPY FEBRUARY!

Thursday, November 30, 2017

STITCHERY JOURNEY, PART 4

Now that the basic stitchery book is finished, the fun part begins.  The inside should contain all the necessities that a stitcher needs to accomplish her stitching tasks.  It's fun to think about all possible ways to gain this very thing.  For this one, I chose a pincushion, a thimble holder, ribbon to attach your scissor, and a wool folder to hold needles (with no "ouch" factor).   I like to thread several needles in different colors of thread to be ready for use as I stitch.
So----from the day I gathered supplies and ideas~~~~~~~~It went from this:
 To this!  As you can see, I did not use all the initial choices.  I wish I could tell you the thrill it gives me to see the finished product and how different it is from the images I had in my mind.  I could never think of all the possibilities of the finished product from the very start.  Each addition spurs another and so on and so on.
 
The pincushion gave me the most problems.  I tried many ways to make it and many ways to attach it but in the end ~~~~~~~~~~~~~~~~~~~~~~~~~~


 the best way I found was to cover it.  I had a small walnut shell stuffed pin cushion that was just the right size.  I wrapped it in my chosen fabric, folded it and sewed the folded ends underneath, then stitched the ends down.  I wrapped the ends with antique lace and stitched it in at the same time --
ALL DONE.


This is the best pic I took of the pincushion placement and stitching.  Before I stitched I played with placement of other things.  Here I had placed a needle folder made of wool to the left and began to design the front of it.  The scissor keeper and thimble holder would be on the right.


For the thimble holder, I placed a piece of 1/2 inch wide elastic inside the fold of my chosen sunflower fabric and stitched closely to it using my zipper foot.  The length of fabric?  I did not measure, but made it plenty long to go around my thimble plus some.  Making first and trimming afterwards is always my motto.  Bigger and longer is easier to deal with.  I hope that makes sense. 


I stitched across one end (left pic) and pulled the other open end elastic (right pic-see the elastic peeking out?)  until I gathered it enough using my thimble as a guide.

When my length was right I trimmed the edge with pinking shears.   I stitched the two ends together leaving the seam to the outside and to stitch it to it's appropriate spot in the stitch book.
The addition of the thimble holder was a sort of challenge because it seemed to get lost on the "page" so to speak.  My solution became a sunflower where I added the thimble as part of it.  the stem and leaves are wool.  Embroidery stitch is buttonhole and the leaves have a chain stitch vein.  The sunflower is wooden.  You'll be surprised what you can find in your stash of stuff is you make up your mind not to buy one thing.  My stuff is awesome!! ~smile~

See how lost the thimble was looking?  Something cool had to be thought of.
 s
Scissors--- I placed the ribbon in the place I thought appropriate and tacked it down enough to try it out.  I had to move it a time or two before I got it right.  Nothing much else to report about this--very simple.

The needle folder/holder is a great way to protect your needles from grabbing onto other things in your book.  Somehow seems they seem to do that if you don't enclose them some way.  Also, threads creep and crawl!

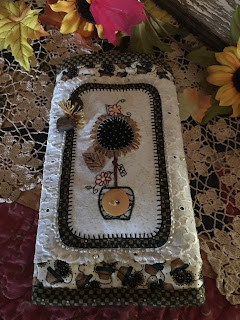
 AI small sign, hand stitched, announcing it's contents.  A button added for cuteness.  I had this darling birdhouse button that just seemed to scream, "USE ME, USE ME!  The pole is small vintage rick rack wrapped with green embroidery thread.  The edge needed definition so I accomplished that with large rick rack.


The little label is just a square of muslin and a hand written  message.  I used a fine point Pigma Pen, then stitched it down with a running stitch.  Ragged edge is my style.  Simple and ragged~~

 The closure is ribbon around a precious button.   Perfectly useful and a lovely final addition.


It's been such a pleasure doing this tutorial as I worked on a project I so totally enjoy!  I appreciate your close attention!  I appreciate your finding some part of my life to benefit you and your little section of the world.  JOY is something all of us seek.  Little things in life is where most of it comes from.  If you don't find JOY in small things, you may not find very much.  I find my total JOY comes from my LORD and SAVIOR, JESUS CHRIST.  If you haven't found HIM, my prayer is that you will very soon. His Word says you will find him if you look for Him with all your heart, soul, and mind.  The place to look?  His Word--the Bible.  It is totally alive and will come alive in your inner most being, your soul.  He is life and brings life, Forever life which is where I find my JOY.  This world brings many many sorrows, but in the promises of Jesus Christ, I can still have ultimate hope and JOY!  If I don't come back before Christmas, Please remember to look for HIM this season.  Without Him there would be no Christmas. 
If you read my blog and enjoy any part of it, I surely would appreciate a comment.  It's the only way I can know you enjoy it.  I don't get paid for any part of it, just love giving a gift to you from me.  If you want to encourage me to do more, just leave me a nice comment.  

Love to all !

MOLLY

Monday, November 6, 2017

STITCHERY JOURNEY, PART 3


Sometimes, the artistic side of me is so slow.  Seems I just think about it so much more that I do it--
But the thinking part is the part that makes me put myself into a project I guess.  I come from a long line of seamstresses/quilters.  I know it's a God given talent.  It's a yearning to make my life and my family's life something special.  It's more than decorative, more than cute, more than pretty, more than useful.  It's making something that no one else would make exactly the same way.

When I left you, I was doing the decorative work on the front of my Needle Book.  All stitching that needed to be done before the back was added so that back stitches could be hidden from view safely between the front and the back. 
 My next step was to add the back or inside background fabric---my canvas for useful additions and beauty to look upon as I (or someone else) stitch.  I decided that sense the back could not be quilted together with the front that I would attach it with Steam-a-Seam Lite.  It's the same sticky backed fusible web that I have showed you before.  You cut out your shape, It sticks to your fabric.  You peel off the backing paper leaving the fusible web.  Then you press it to whatever you wish.  It's lite so it leaves everything as would be without it.  No thickness and is still bendable and flexible.
Because the top had been quilted there was a small difference in the size.  I simply trimmed away the excess fabric of the back, then-------
 come the pocket ends.  The ones you were not to trim.  Remember those? 2 1/2 inch pieces of fabric folded in half.  As you can see, I chose an antique lace and stitched it along the folded edge.   Here they are still untrimmed.

  I laid them in place and pinned them to both ends.
 The binding will be the next step.  It will be attached sewing through several layers.  I decided that to keep all layers snugly together that I would stitch the corners just outside the stitching line so I could relax as I stitch the binding on. 

Guess What???  Now you can trim!  Above picture shows that we are ready for the binding! 
Cut 2 1/2 inch lengths of your choice of binding fabric.  Enough to go all the way around plus extra.   How much extra?  Hummmmm.   Honestly I just know that I cut at least an extra length.  The way I put my binding together uses up extra fabric, but makes it look so much nicer!
 This is the way you sew the pieces together.  Enlarge the pic so that you can see where to start sewing and where to finish.  It's the tiny V that forms from offsetting the fabrics as you lay them together.  You can draw a line or simply keep your eye on your destination.  I have learned that through the years.  It just works.  Keep your eye on where you are sewing to and you will sew straight there every time.  Go ahead--draw the line--I know you want to.  -smile-

Here you can see that I am sewing straight toward the V offset point.  My snips are pointing it out for you.
 If all is done as I instructed you when you straighten out your sewn pieces they ill be straight with a diagonal seam.  This distributes the bulk and your stitched on binding will be beautiful. 
 If all looks good, trim the seam to 1/4 inch. 
 Fold your long strip of binding in half and press it.  You can use some spray starch if you want to make it nice and crisp so it will hold it's shape.


 Here is what your diagonal seams should look like inside your pressed binding strips.
 It's time to stitch your binding on. Your can stitch it on the top or back.  I stitched to the back so my hand stitching would be on the front.  If your hand stitching is not so good you might want to machine stitch to the front. Stitch slowly and keep your seam at 1/4 inch. 

 I am now finished stitching the binding on, I have pressed it to the front and I will begin hand stitching the binding down on top.  I use a slip stitch.  Hiding your thread is the name of the game.
Go here if you need instruction.

Your first sneak peek of the finished product.  Next time we will be adding all the goodies to the inside.  I promise it won't be long as I am almost done.  I love the way the binding fabric frames the sunflower fabric.  It's a day in the country!!  If you haven't been sewing along with me and want to start now---do it--choose those fabrics that are "YOU".  Maybe you can catch up before the finale!  Your gonna love the ending.  It's the part that always gets me.  See ya soon, sweethearts!

Would love a comment or question!!!

Molly 


Related Posts with Thumbnails

Thanks for stopping by--Please Come Again!

background