Saturday, May 26, 2018

BACK TO THE HEXIES!

It's been a month since my last post.  I was so going to try to post more often.  I think I need to schedule posts.  I am sure that is how everyone keeps their promises to themselves and their readers.  I have been so busy with end of school activities and birthdays (3 in May) and other issues that I'd rather not think about.  You know the ones that are not so pleasant.  The unexpected that just pop up to remind you that you are not in control of anything?  That's what I am talking about.
My hexie project is still ongoing and has made a turn in another direction.  I went looking for ways to put them together and found a fantastic site and fantastic quilter who I have admired for many years and did not know she was a hexie fan.  You will find her HERE.  I love the way she fussy cuts fabric to get some fantastically unique hexies.  They I found her way of putting them together.  The link I shared shows part of it but not all.  You MUST search all her hexie posts and discover all her tip and tricks.  She is a hexie guru!
 My hexie box that I have by my chair.  I find myself wanting to sit there more and more!
 After exploring Jo's posts I decided to go scrappy with my joining hexies (you knew I would!  So did I!) smile   Here you can see a small pile of about 6 that I have finished.  This is such a fantastic way to use scraps.  All those fabrics that you love going into a quilt that you again can enjoy each time you see them.  Some quilts that may be gone away as gifts.  Now that memory is yours to keep.
 I decided to lay them out  to see what MY hexie flowers look like together and ----gasp------
I discovered that I had misplaced a hexie or two.  When adding the five on each flower, you must start and end on the hexie's side.
 As you can see here, I ended on the top of the hexie.  I only had to remove one and-----.....
 add it to the other side of the group.  AAAhhhhhhh!  Now--that will work.  How do you like the scrappy?  Come on---tell me the truth!!

Here are a few of mine as they will look put together.  It's a bit of a trick figuring out how to turn them.  But I soon got the hang of it.  (Is that Texas slang? )

 Back to my making of the hexies themselves, I tried using a paperclip instead of just holding the side down with my finger or using a pin and I really do like it.  I chose a plain metal small paperclip and it worked great.
 It kept all in place as I stitched all the way around and around.
 I only took it off just before I made the last stitches to finish the hexie.
 More hexie papers had to be made and I was afraid I had made a mistake by taking my papers out as I finished a flower.  I don't think it's going to be a big deal, but think I won't take anymore out just to make sure.  I think Jo says she only took out her middle ones and left all the others in.  My printer quilt working or I would have printed Red Scissors 1 inch hexagon template that you will find a link to HERE and cut them with a rotary cutter.  I had to use scissors and took me forever!!  I cut them from card stock or any thick paper.  I often use the card paper that you find inside magazines.  The ones you tear out--they are usually magazine subscriptions.  Old greeting cards work great too!


 I'm ready to stitch and stitch and stitch.  I have a fairly large pile of hexie papers and fabric cut.
I hope there is something of interest here.  Something to inspire you or help you in your hexie journey.  I am splitting my posts between projects so hopefully I will be posting on a different subject soon.  I already have an idea as I have been working on my Art to heart quilt.  I am ready to start on Block 6 and am putting a new twist on some of the blocks.  I always have to change things you know!  See you soon !!!!

Molly

Saturday, April 21, 2018

BLOGGING IN MY MIND DOES NOTHING FOR YOU!

HEY AGAIN, GUYS!!!

I've been blogging in my mind for weeks.  I know this does nothing for YOU, but hopefully it will be somewhat worth the wait.  I'm working daily to make progress on my challenge blocks.  Also working nightly to make progress on my hexies project.  My third commitment for this year is a quilt by Art to Heart called Be Attitudes.  I won't show you my progress on this quilt just yet.  Although I have blanket stitched 3 blocks (January, February, and March) and have till the end of the month to finish April.  I am contemplating changing April and going radical.  More to come on that.
My hexies are piling up!  About 85 so far and I'm still excited about them each day.  I never know how long the enthusiasm will last, ya know?   

I am finding less and less time to work in my sewing room.  Spring brings so many activities--from lawn and garden work to grandchildren soccer and baseball games.  I'm not complaining but do enjoy a good day when I have nothing to do buy turn on some music and get some sewing/quilting done.

Here is my newest group.  I have papers enough for 9 before I have to remove them and start a new group.  I remove the papers first, then spray them with Magic Sizing and then press with a hot iron.  The edges press out straight and smooth with sharp corners as you can see below.


I then press my papers flat and smooth ready to begin again.  The backs of my flowers don't have to be beautiful.  I cut my fabric pieces for each hexy big enough so that I never feel short of fabric as I am stitching.

Below is my latest group as they will look placed directly next to each other in a setting.  Who knows how I will decide to set them.  To get confused I just go to Pinterest and type in Hexies.  Oh my---such possibilities.  It's mind boggling how much inspiration I can find there.  So much that I find it impossible to get started doing something--anything because I might not be able to make up my mind.  So I sit and do nothing with them.  How silly is that.?
There are also so many different ways to make hexies that can be found on Pinterest.  I think there are as many ways to make them and put them together as there are people who are doing it and that is "oh so many".  There is only one perfect way--the perfect way for you--your way is your perfect way.


I'm moving on to my "Cakestand blocks".  Remember that I am involved in making 3 different challenge blocks.  Two from Buttermilk Basin and one that is just a challenge on my own -- Art to Heart "Be Attitudes" quilt.  One block per month until they are done.  I changed my mind I will show you these blocks for January, February, and March.  Stitched out but the hand embroidery is not done yet.

The Cakestand blocks are almost done through March.  I need Eighteen blocks to be caught up through April.  I now have 10 almost finished and several more cut out and ready to stitch.  They are so much fun to put together.  I think I love scrappy quilts because even if your making the same block, the different fabrics keep the process all fresh and new each time.  I find myself getting anxious just to see the finished product. ---then I just sit and admire it.
Flock of Geese blocks are 17 in number.  

Hopefully next time I can blog that I am caught up on all my challenges.  I want to be to the point that I am actually making one block per week as was the project suppose to progress.  I got started late and am in a constant state of "hurry up and catch up".

I hope there is something about this post that you enjoyed.  If there is some aspect of any of this that you would like to know more about, please leave it in the comment section.  I appreciate your stopping by and giving me a glance or a moment of your precious time.  I hope it was worth your stay.  If not, please let me know how I can be of service to you.  All the thoughts here are completely mine.  I give credit where credit is due if I am using someone's patterns but my own.

Let me close by saying that none of this would be possible if someone hadn't loved and died for me.  I have a Savior.  His name is Jesus Christ.  He is my LORD.  He rules my life.  He makes all things possible.  He blesses me in so many many ways--I can't possibly tell you about them all.  I can love because He first loved me.  He Lives and because He lives, I can find hope in also living again with Him someday.  
See, God has come to save me.  I will trust in Him and not be afraid.  The Lord God is my strength and my song; He has given me victory."  Isaiah 12:2

For God chose to save us through our Lord, Jesus Christ, not to pour out His anger on us.  1 Thess. 5:9 (NLT)

LOVE AND BLESSINGS OF GOD TO ALL OF YOU!

MOLLY


Tuesday, March 13, 2018

Loving the Process!

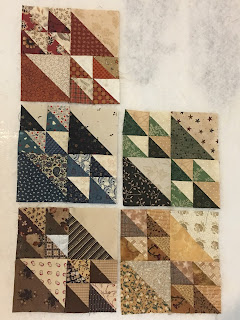
I told you all about 52 week Quilt Block Challenges that got me excited about making blocks HERE.  I am still "LOVING THE PROCESS"!  I almost always go "scrappy" with any quilt, but this time I decided to make my Glying Geese blocks scrappy but stay in the same color range within the block.  Pieces as small as 2 inches can be worked into a block!  It's awesome.  I have been cutting and sorting fabrics into color stacks and auditioning blocks within the blocks, not sewing them together until I absolutely love the way they look.  I have 5 Flying Geese blocks finished, but larger and smaller half squares and fabrics for many many more half squares cut and ready to be sewn together.  

 This is my January group--------one each in brown, green, rust, blue, and gold.
JANUARY-- UP ON THE BOARD!
 BROWN!
 BLUE!
 GREEN!
 RUST!
AND GOLD!


 Here is my sewing machine table with pink sets being auditioned and 2 1/2 inch squares ready to be sewn into half squares.  Making sure no fabric that I don't absolutely love goes into each block.  I had to search for pinks that I would use to put into a quilt as I am not a pink lover.  Ten more blocks to be caught up with this challenge then on to the

 CAKE STAND blocks.  I have this darling wicker basket where they will soon be piling up!!

 I have the pieces cut and bagged--enough for 14 more blocks which will be thru March.


And last but certainly not least, is the Quilted Moose Quilt Shop 2019 ---9 inch double 9 Patch block.
All I have done for this one is cut strips.  All scrappy blue, I can't wait until their turn to go to the sewing machine table.


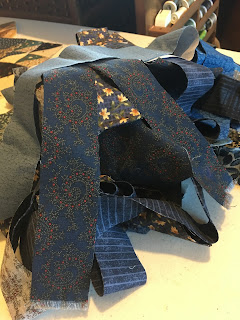
Here is my stash of cut pieces to use for scrap quilts.  I cut different sizes of squares from scraps instead of throwing them away.  This stash has really come in handy for these challenges.  This triple decker stacker is a Christmas Ornament storage box.  You need one!!!

This is the reason I have not gotten  all my challenges done!   This quilt has been in a box waiting to get a finishing touch.  It finally got it.  My grandmother made a Burgoyne Surrounded.  I wanted to experience making one for that reason.  It was an experience.  Let me just say I am glad it is finished.

Love to all my quilting friends (if you are still out there)!

Have a great week!!!  BE BLESSED!

MOLLY

Monday, March 5, 2018

GRANDMOTHER'S FLOWER GARDEN (Hexies revisited)

My sweet blogging friends!  have we had some weather in Texas this winter.  Some of the coldest and wettest I've experienced.  But today has been very pleasant, in the upper 60's and sunny!  I love sunny days.  I am appreciating the sun more right now because for about 3 weeks, we have not seen any--only rainy and wet, wet, wet!
This leads me to today's post topic~~~~~~~~


English Paper Piecing---A method of using paper to stabilize small pieces of fabrics as they are folded and tacked around the paper then sewn together in small groups and then sewn together to accomplish your desired project.  Grandmother's Flower Garden is a pattern that became very popular in the 1930s.  I began mi GMFG as a TV project.  Small pieces of fabrics that would otherwise be discarded can be made use of in this way.  Small flexible card stock is my paper of choice.  The kind you find as an advertisement in a magazine.  Possibly as a magazine subscription card.  Each side of my hexagon shaped template is about 1 inch.
  I searched out a tutorial and finding it, I also found this precious Travel Kit.  I was hooked-- my heart fell in love with this quilt making process, although I have not put one together, I am still just making EPP flowers!
 The tutorial and the pattern is awesome and is the best travel kit I've ever had.   The size is great!  It holds everything needed with room to spare.   The biggest plus is it is absolutely adorable!  At first glance you know what it is for and what is inside.  By using your favorite fabrics, you can make it your own  Mine closes with one of my favorite pearl buttons!

The inside has 3 convenient compartments.  I put my finished hexie flowers in the front pocket and still have two compartments for other supplies. 
The sides are accordion style!!  This is about the best design I've seen!  No matter how much you stuff into this little kit, you can bet it will fit!  Even a small light.

An extra pattern for a delightful little pin cushion is also available.  I made one and attached it to the inside flower.  I can put the pins in sideways and still close my kit.  The magnetic closure is one of my favorite features.  


Here are a few of my sets waiting to be stitched. Picking fabrics for my flowers-----AAAAHHHHH--  I love the fact that all my favorite fabrics from different projects can be used together so that I can be reminded of them all.  I love auditioning centers until I just can't wait to get the flower made to see how precious it looks.  (I know you all think I 'm a little crazy).  


Let me show you my process~~~~~
 I use to use a glue stick to attached my hexie pattern to my fabric, but have resorted to a pin.  It makes taking those papers out so much easier.  I fold the corners right under left going counter clockwise, continuing all the way around, tacking as I go.
 Then I begin whip stitching the hexies together starting with two petals, then add the center.  I use matching thread, but here I have used contrasting thread so that you can see the stitches.  My needle is a straw and I pinch the hexies together as I go so as to keep the sides matched.

 As you are stitching around the center, you will need to travel your needle to another corner.  Start at the corner you ended with to the adjacent corner you need to go to traveling under the fabric being careful not to go through the paper onto the front of the flower.  In above pic see that where I entered and exited from the back of my hexie.
 Sometimes you will need to bend one hexie to get to your stitching point but that is OK!  It seems to me that the more I use my papers the better they work.  They become flexible and have a memory so that they know exactly what to do and when to do it!
When I get through with 4 or 5 hexie flowers, I take the papers out.  Most tutorials tell you to leave the papers in to stitch them together, but I have found that I like taking the papers out so that I
can use them again and I don't have to have so many papers.  After the papers are removed, I take my flowers straight to my ironing board.  I spray them with Magic Sizing and give them a good press.

Aren't they pretty!!


"Therefore I tell you, do not worry about your life, what you will eat or drink; or about your body, what you will wear. Is not life more than food, and the body more than clothes? Look at the birds of the air; they do not sow or reap or store away in barns, and yet your heavenly Father feeds them. Are you not much more valuable than they? Can any one of you by worrying add a single hour to your life?"
– Matthew 6:25-27

Until we meet again!

Molly


Related Posts with Thumbnails

Thanks for stopping by--Please Come Again!

background