
Click HERE for the PDF
YYYEEEAAA HHHHAAAWWW, Cowgirls and Cowboys~~~~it's time for a change of attitude. After guiding 5 of my friends as they made a feathered star quilt block, I have decided that the need is large to give quilters some much needed confidence that the feathered star is a doable block. Nothing more than a fabric puzzle, the Feathered Star just has more pieces than most blocks. Rules must be followed, but if you treat the block as a simple 9-patch block and assemble each section ONE AT A TIME, you CAN do it.
Say this over and over until you really believe it, "HARD BY THE YARD, BUT A CINCH BY THE INCH!". This is our MOTTO for this project. One step at a time, if yo will stay with me, we will be successful in making a Feathered Star quilt block!
I am going to go on and tell you that it is not even that important to get the seam allowance the exact right size. What IS IMPORTANT is to sew with a consistantly sized seam allowance. That being said, I will tell you that when I discovered that I could actually make a Feathered Star I learned that if I could sew a consistant seam allowance all my pieces would fall together like dominos. It is the best thing since sliced bread (as my mother use to say). There is alot that has to be done here on the ranch, but YOU are the focus as I attempt this feat. So, quilters, the cows are grazing in the fields, it's not time to harvest the hay yet, the chores have been done, the big kids are in school and the little ones are taking a nap, and supper is in the "Crockpot". Let's prove that you CAN make a Feathered Star Quilt Block! Come on! What have you got to lose? A little stash and a little time--but what you have to gain is confidence and beautiful Feathered Star Block to use as the center of a wall hanging or a focus on a new tote. Let's get started---------
In this post I will guide you in picking out your fabric, give you some beginning tips, a tutorial on making half square triangle units using a method called bias strip method. This is Step one to making your star.
TIPS:
1. I use starch or Mary Ellen's Best Press on my fabrics before cutting. This gives the pieces stability and helps keep the bias edges from stretching. When pressing do your best not to move your iron around on bias edges. Not touching them with the iron at all is best, but sometimes, you just can't help it.
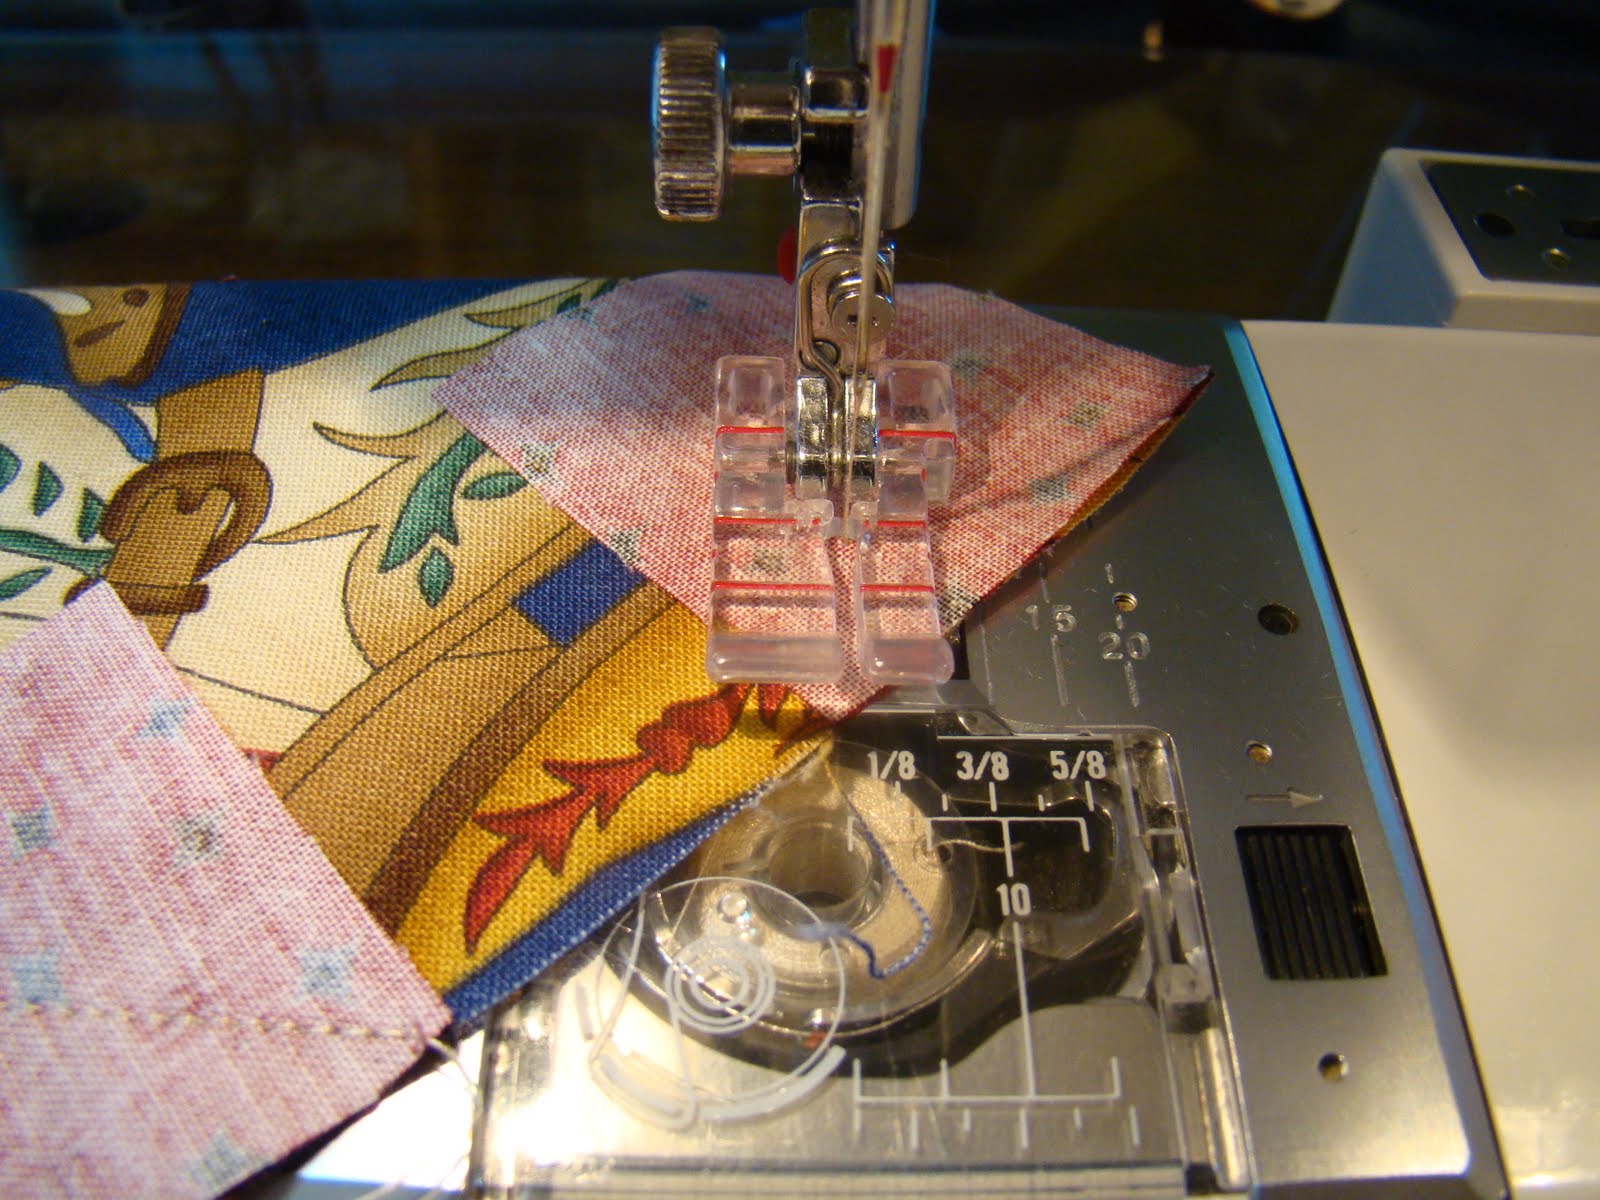
2. Test your 1/4 inch seam allowance to make sure it is as close to perfect as it can be. Recently a friend recommended this foot and I have certainly enjoyed using it. If you are having a problem getting that perfect 1/4 inch seam, this might just be your answer.

It has a small spindle (disk) that will slide to the right or to the left to adjust your seam just a threads width.
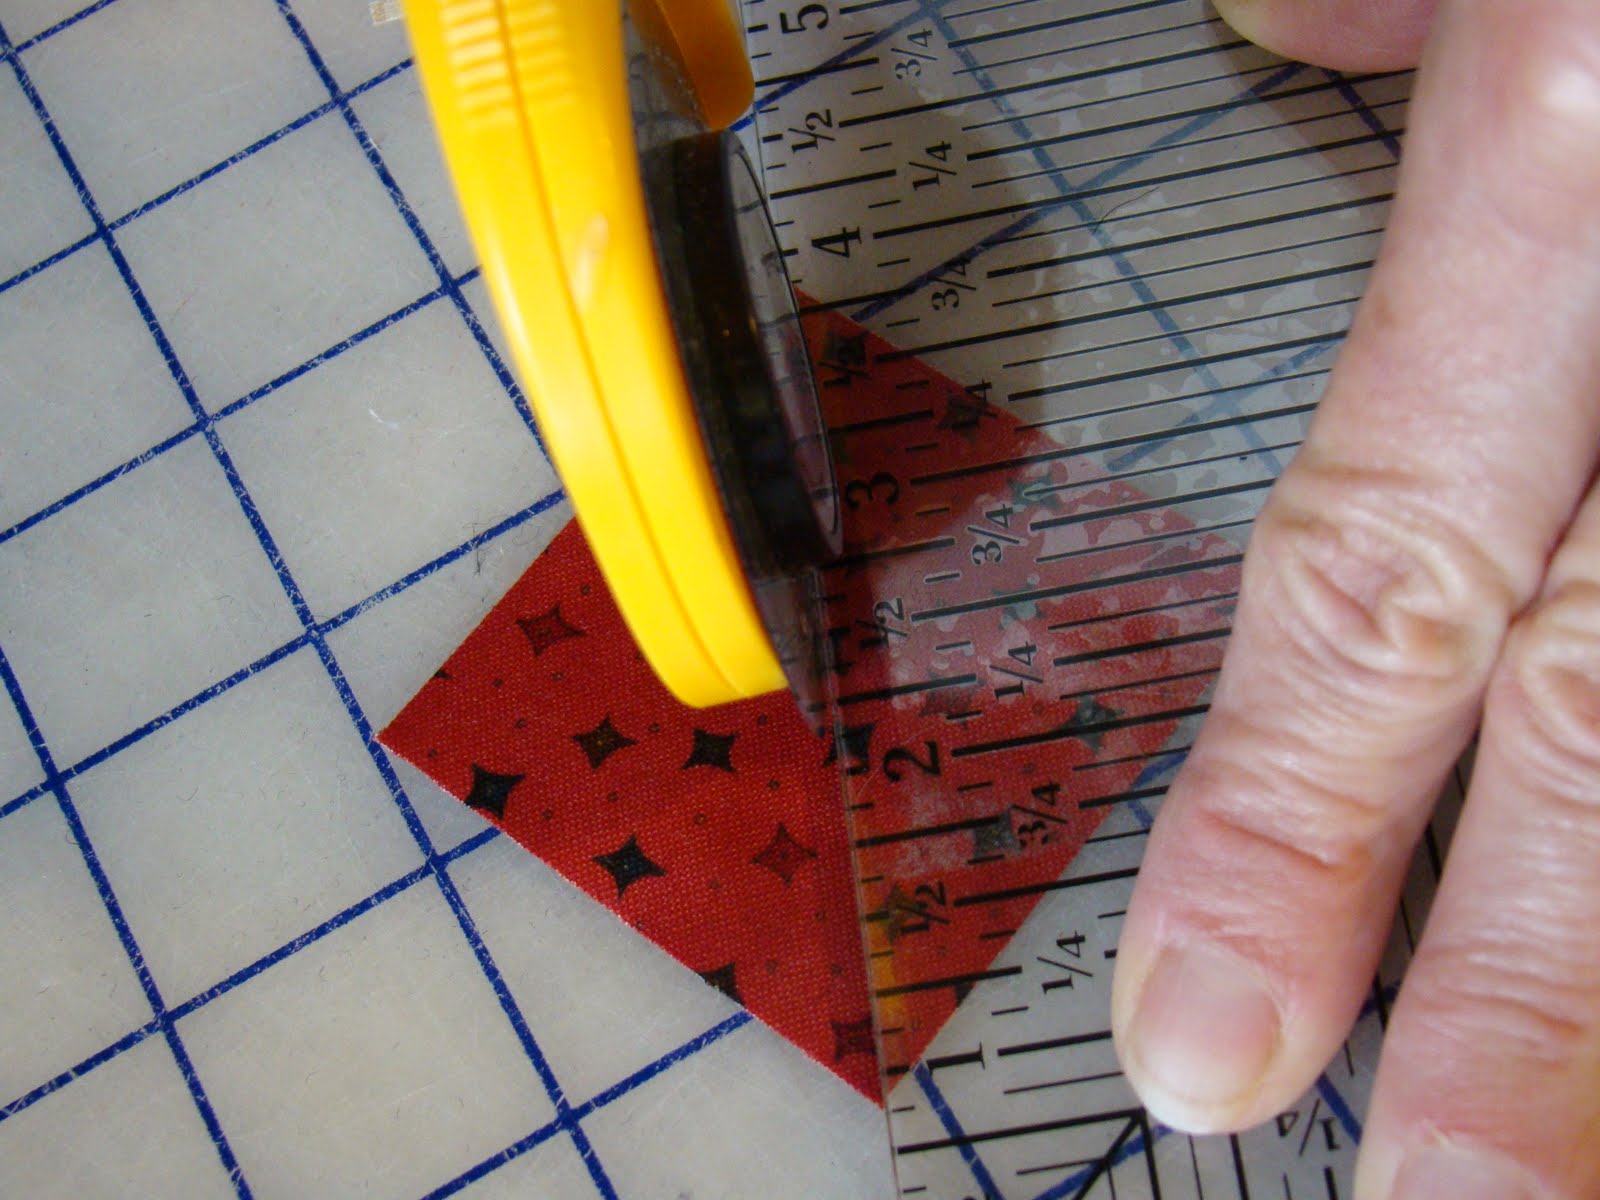
3. The rulers I use are a Bias Square ruler and most recently purchased Marsha McClosky's Feathered Star Ruler. It includes small increment measurements (1/16 most common) that are frequently needed for Feathered Star Blocks. I have made many Feathered Star blocks without it, but it certainly is a nice ruler to have to use and you can find it HERE. Any quilting square rulers will work. If you come across a piece that has 1/16 inch measurement and your ruler doesn't? Just cut the closest you can between the 1/8 inch measurements (1/2 of 1/8 is 1/16th). I know you knew that!

I like to use this ruler to cut most pieces.

Marsha's new ruler is really cool!! It is very much worth the $15.00 plus S&H.

FABRIX--This is a Stash Buster project. For your first FS, consider making it with stash fabric. One block--that is all--just one block--!! You will need 5 fabrix.

Your 5 fabrix will be used for the~~~
1. Background squares, 2. Half square trianges (feathers) 3. cornerstones, Star Tips and triangles that join to the kites and the squares that make the snowball block (all the same fabric for your first block) 4. kites peices. 5 . Focus fabric for the center snowball block.

(Click to enlarge this picture and study the names and placement of each piece)This diagram is an attempt to help you become familiar with the pieces of the star, know what they are called so that you will know what pieces are what fabric when you are cutting.
Cut 2-- 10 inch squares--one of feather fabric and one of background fabric. You will use a the Bias Strip Method to make your 32 half squares for the feathers of the star. This is your first step. Easy, breezy--no pressure. If you have not used this method before, let me say that I don't know if Marsha Marsha invented this method, but she uses it and it is great for this star. You will place the two 10 inch squares right sides together (RST), use starch or Best Press and press dry.

Place the correct measuring line on the ruler so that it covers the edge of the fabric. You don't want to be able to see the fabric edge.

Make a cut diagonally from corner to corner then make 2 inch cuts in both directions until you have cut the entire square. Sew the sections together on the longest edge and press the seams open. Then sew the sections together.

Your bias strips wll look like this.

Start cutting your Half square feather units from the bottom.

You will keep cutting them always from the lowest point.

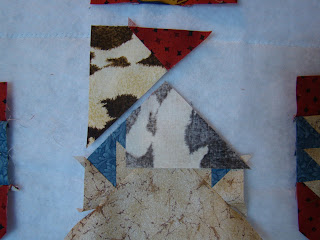
Rotate the block and trim to the exact 1 1/2 inch size.

This is only the first installment of the Feathered Star Tutorial. This is taking more time than I thought it would, so please bear with me. I will get you there. I don't want you to agonize over the process, but it seams that I need to include alot of information to make sure that EVERYBODY can ride this horse home!!! If you know what I mean---lol SEW--Just make 32 1 1/2 inch half square blocks -seams pressed open--to be used for your quilt block's feathers. I don't care how you make them, just make them and I will come back soon to tell you what to do next!
STEP 2
My 5 friends are firm believers that the Portable Big Bock Flannel Board is a real key to staying organized as you make the Feathered Star. Go HERE to see how I made mine. It will only take about 30 minutes. Now is the time to get that done.
Time to cut the rest of the pieces for your Feathered Star.

Star Tips-Start with a 1 1/2 inch strip. Use any ruler with a 45 degrees line. Align the 45 degree line along the edge of the strip.

Make the cut and then---

Rotate the strip and align the 45 degree line again, put the tip of fabric on 1 1 /2 inches- then make your final cut. You can fold your strip to make two diamonds for each cut for a total of 8 diamonds.

Cornerstones--8 - 1 1/2 inch squares. These can be cut from the same 1 1/2 inch strip as the diamonds.

Now--you will need 4 triangles to add to the kites. These along with the corners of the snowball block form the circle in the center. Cut two squares 2 1/8 inches.
Cut these squares diagonally yeilding 4 triangles.
Last, but not least, cut 4 squares to be used to make the coners of the Snowball block at 1 3/4 inches square.

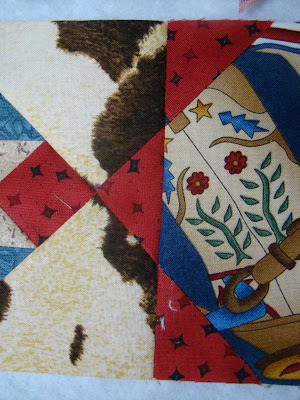
These are the pieces that are cut from the same fabric.

The center of your block can be a focus fabric and can also be fussy cut if you like. For my western block, I chose a boot fabric. I picked just the boot I want to focus on. The block is 4 3/4 inches.

Kites are cut from 4 -- 3 7/8 inch squares that are cut diagonally.

Then you measure the length of the square down the long side of the triangle, in this case 3 7/8 inch.
You can see the kite shape underneath the ruler.

Cut off the pertruding triangle.

This is the goal shape called a "kite".

All the pieces except the background squares and triangles. Now lets cut those.

Background triangles --- 1 - 7 1/2 inch square cut diagonally twice ---

4 triangles.

5 1/4 inches square.
Ok Dolls and Guys--start cutting and I will see you soon for step 3!
STEP 3
OH MAN!!! You still have one triangle to cut--sorry--it was not until I began to put my own block together that I realized it. It is background fabric (same as large squares and triangles) and the size is 1 7/8 inch. Cut 8 squares and then cut them once diagonally which yeilds 16 triangles.

Before you start to sew, be sure you have a fine sewing thread in your machine and bobbin (I use 50 st.)
A fine needle (I use a 60/8)
Test your seam allowance
Sew slowly. You will sew more accurately if you sew slowly. You don't have to use pins unless you just HAVE TO. If you take my advice above you will never lose your points or your marbles! LOL

This is the layout for one of the corner blocks. There are 4 of them. This is the easiest of the two blocks that complete the Feathered Star, so we will start with this one. Does anything look difficult in this block? Looks pretty straight forward to me. The only thing that you might have a little problem with is sewing the diamond to the triangle. The red square is a cornerstone. We will stitch the pieces of each side. The conerstone (red square) can be stitched to either side. It doesn't matter which. Lastly, the shortest side will be sewn to the background square first, then the long side---
Now, lets do a little press talk. When you sew the half squares together, press the seams open. On any other seam, you will press for ease of construction. What does this mean, you say? Well, this is the best I can do to help you. After you sew a seam, let the seam go to the side where there is less bulk. A little farther down I will show you the back of the strip pieces of this block.

Sew the diamond and the triangle first. You always match the narrow tip of the diamond right sides together to the triangle as shown above.

Stitch the segments in the pattern shown above.

Here is a pic of the diamond/triangle of the other side ready to be sewn.

Here I am showing you the back of the strips so you can see how I pressed the seams.

Side strips ready to be sewn to the background square.

Flip the shortest side and sew.


This is 1/9th of your feathered star block finished. You need 4 blocks just like this. They will be your corner blocks. BTW--if your background squares seems a little big, don't worry. It is cut big for a reason. Just sew the strips on and don't worry about it when the tips don't sew off the edge. Remember, I AM THE TEACHER. You don't have to know EVERYTHING. You WILL ride this horse home, I promise. Now---get busy with the other three blocks and as usual--I will be back with step 4.
STEP 4--HOPE YOU ARE READY!!
I hope you got your 4 corners done. I hope they look fantastic! We are ready to construct the other 5 block parts. You know, there is the center Snowball block and then the other 4 blocks--the ones with partial seams????? NOW do you remember? OK--I thought so----
Let's start with the Snowball. Grab your center focus fabric square and your four corner squares and lay them RST on your large center square.

You will sew diagonally across each small square. I hope you can see in the pic that I use the edge of my foot as a guide to sew from corner to corner. You can draw a line on your square with a pencil if tha will help you sew straight. Remember to go slow and keep you eye on your destination (the other corner). If you keep your eye on your destination, you will sew right to it. TRY THIS--IT WORKS! Listen to this--Since I use the edge of my presser foot as a guide, I am actually sewing just a thread or two to the right of corner to corner. This is just where I WANT to sew so that the side thaat I flip up will cover the whole corner. I hope this makes sense to you. After you do it, I think it will.
Sew all the corners without taking the square out of our machine, just pull with thread attached as you move to each corner and continue to sew.

Can you see that my stitching line is to the right of the "corner to corner" line where my presser foot was lined up? I hope so. Press the triangles up to the corners.

Back of square after stitching. All looks lined up!

Just a little trimming to do so that the corners will be exactly the size of the original square.

Check out the slivers that I trimmed off.

Trim the back TWO layers to 1/4 inch.

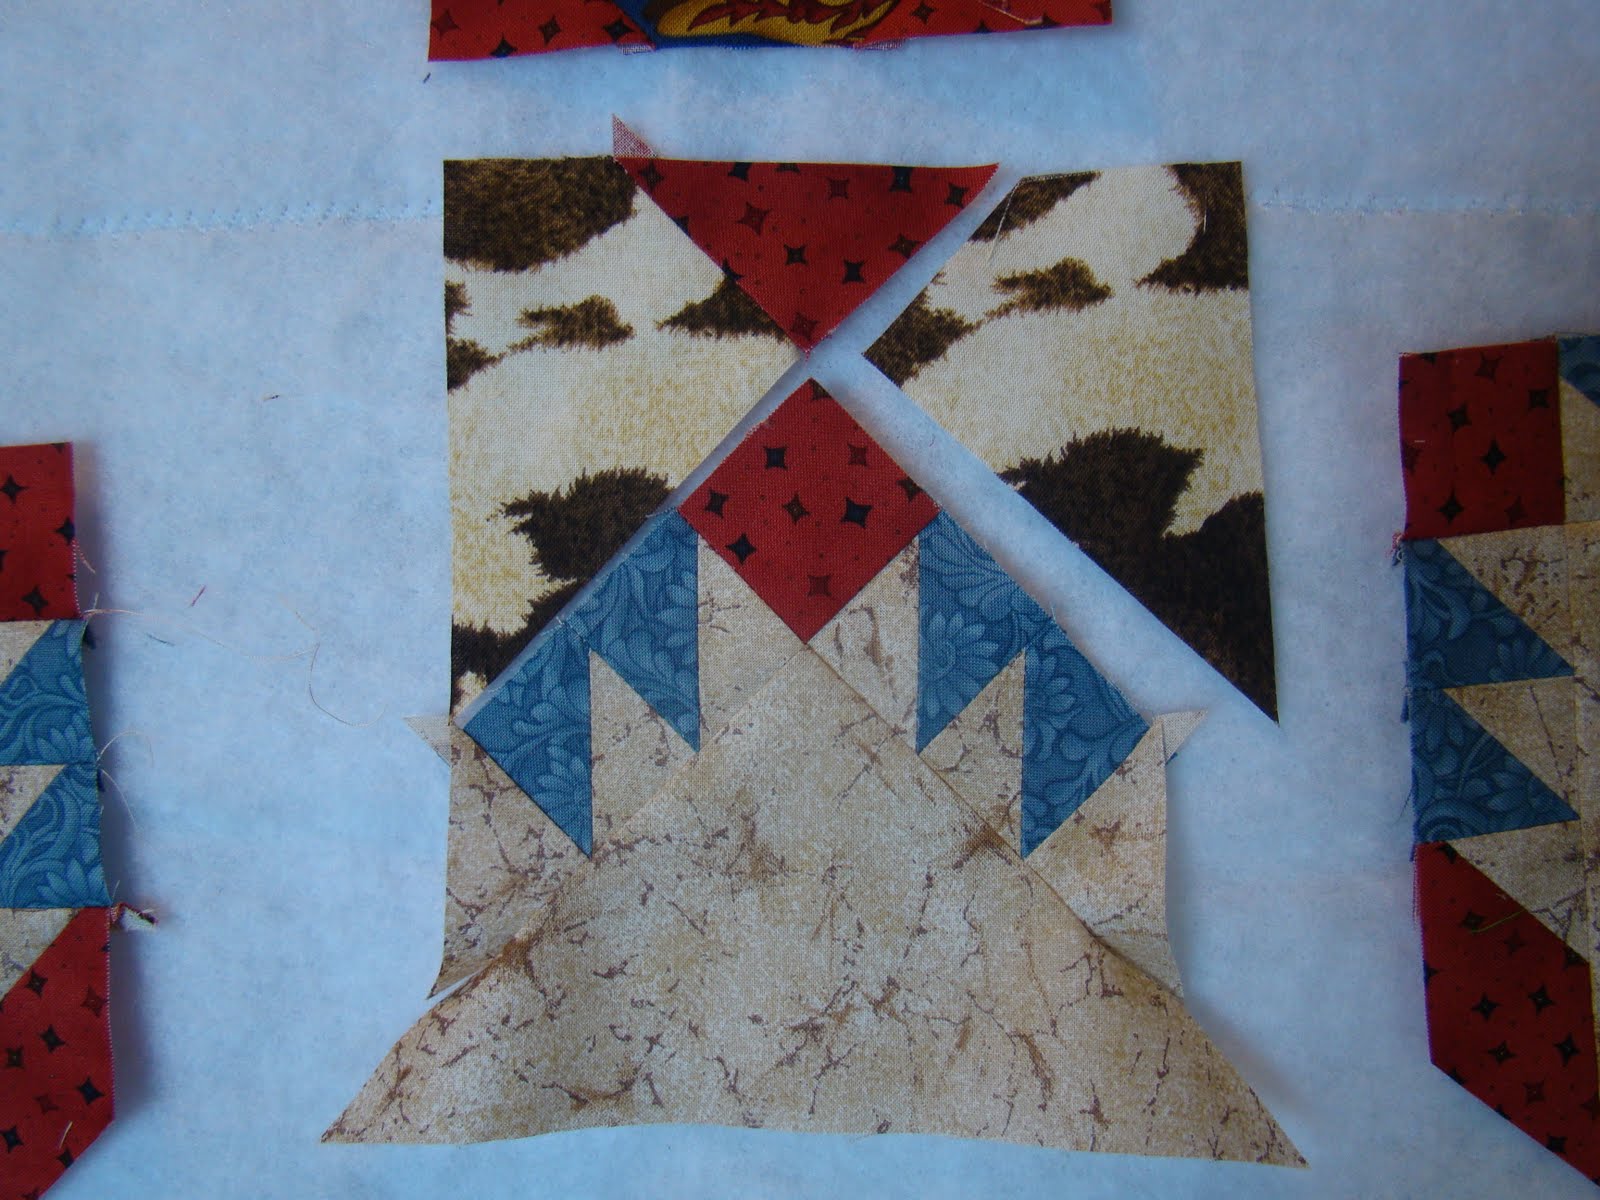
On to the last segment of the block--don't get scerd now! This is the layout of the pieces.
Sew the feathers t the "end of feather triangles as you see in this picture, sewing the cornerstone to the end of one of the strips.

When you sew to the large triangle, you will stop sewing about halfway down the side of the "end of feather triangle". I have pulled back the large triangle so that you can see where I stopped sewing.

This is another picture of when I stopped sewing.

Sew the feather triangle to the Kite piece. Take note of the placement. Press seam toward the kite.
This is what I have sewn so far. No problems?? I am so proud of you!!!

Fold th single kite piece down RST and align with the feather strip as you can see above.

Press up and press well on a firm surface.

Sew far Sew GOOD!

When you flip the last piece down you can abutt the seams as they go in opposite directions. Put a pin in here if you need to or just wiggle really good and stick it in the machine.

This is what you should have so far. LOOKIN GOOD! WHAT?? You say you want to sew the bottom ow together? OK! I always get antsy at this point too! I want to see progress! The end is actually in sight, isn't it???????

Pin the little sloppy unsewn corner back out of the way so that you don't catch it by mistake and sew the corner block to he middle block on one side. Put a pin in at the point of match (diamond point to feathers and kite point) if you need to.

Ten you will be able to smooth out the unfinished seam and sew it really easily. I hope this is clear. If it is not, email me and I will try again!

This is what you should have.

Do the other side exactly the same way and you will have the bottom section done. Do 3 more sections as we did above. Also you can finish your top row just as we did this row. I will be back to help you with the middle row. It is basically the same, but I will give you moral support as you stitch the last stitches.
GOOD LUCK!
STEP 5---Well, how did you do? Have you been sewing slowly.???? It sure does help to keep your seams straight and even.


 Tthe points match as you can see above.


 You can always add background fabric strips around the block and trip down to a chosen uniform size.
The more seams in a block, the harder it becomes to get it the perfect size. Even the most professional quilter will tell you that with a block this complex, the quilt will mostly be designed around the block. Many times you will see a feathered star "floating" in a quilt. Don't think because your block is not the exact size that it is suppose to be that it is not a usable block. In my Feathered star quilt, I don't think one of the blocks is the same size.
My hope is that all your blocks will be perfect, but in case they are not, you are the only one who needs to know the truth. Now, I know what you are thinking, "Molly, is your block the exact right size?". Ok, let me tell you---------------------------------------------------------------------------------------------------------------------------------------------------------------------------------------------------------------------------------------------------------------------------you will never know.
I told you that I would help you ride this horse home and you did!! I am sew sew proud of you!!
Love to all Feathered Star lovers.
GOOD LUCK!
STEP 5---Well, how did you do? Have you been sewing slowly.???? It sure does help to keep your seams straight and even.

As you can see, I finished my other 3 sections.

Then I sewed the top row just as I had done the bottom row.

The middle row is sewn straight forward.

There are two matching points on each side as you can see above. You can pin if you chose. I do not.

The seams to the middle section are pressed to the outside
The seams on the top and bottom sections are pressed towards the middle.

Next is the seam to sew the top row to the middle row. You have a partial seam to deal with. The corner of the side triangle extends as you can see above.

Fold it down to get it out of the way and put a pin in that corner to hold it out of the way.

After you get the partial seam out of the way, sew the seam. This is the way the end of the seam will look. Take note of the small triangle extending on the end.

I am holding the same corner after the seam is sewn.

Now you have to finish the partial seam. You line up the seam-----
 Tthe points match as you can see above.
Stitch the seam. You should have a 1/4 inch seam past the diamond point. The corner square should extend past this point and look too large, but we cut it bigger to begin with for a purpose---REMEMBER???? We can trim it down to size. The way I figure it, it is much better to have extra fabric and trim away that to not have enough--because then your SOL!!! (I hope you know what that means--it ain't good.

Here is the completed block. YYYIIIPPPPPEEEEEE! YOU DID IT!! (I hope)!!

OKKAY--now to the trimming--
This block SHOULD be 15 1/2 inches square--maybe in a perfect world-- But let me say that this rarely happens. But, it doesn't matter and let me tell you why. Your block is beautiful, RIGHT? All you need is 1/4 inch (or smaller) to sew a seam in a quilt. So you trim each side and include the 1/4 inch seam.
Now for a very important tip--

The more seams in a block, the harder it becomes to get it the perfect size. Even the most professional quilter will tell you that with a block this complex, the quilt will mostly be designed around the block. Many times you will see a feathered star "floating" in a quilt. Don't think because your block is not the exact size that it is suppose to be that it is not a usable block. In my Feathered star quilt, I don't think one of the blocks is the same size.
My hope is that all your blocks will be perfect, but in case they are not, you are the only one who needs to know the truth. Now, I know what you are thinking, "Molly, is your block the exact right size?". Ok, let me tell you---------------------------------------------------------------------------------------------------------------------------------------------------------------------------------------------------------------------------------------------------------------------------you will never know.
I told you that I would help you ride this horse home and you did!! I am sew sew proud of you!!
Love to all Feathered Star lovers.


34 comments:
I'm thinking I will have to delay starting this as right now I'm heavily involved in a project and need to keep working on it. I will refer back to this when I can take the time to do it...as I cannot believe how easy you say it is to do!!! LOL
Great post Molly.....come on everyone....join in the fun....you'll walk away with a great FS!!!!
its Great post Molly.
PPC Advertising India
Molly, thank you for taking the trouble to post the feathered star, I have always wanted to know how to make this and will definitely have a go at it. Please do not stop posting your BOM's and other instructive items, I am sure there are a lot of people who download and make them later, of course they should comment as well.
Hi Molly,
I just found your blog & love it.
Thank you for the wonderful instructions on how to make a feathered star. You explained things wonderfully, easy to follow & understand. I am going to go try this. Please don't stop your instructions.
Hi Molly,
Thanks a lot for this tutorial.
This block looks so gorgeous! It seems so difficult to me but your instructions and photos are clear. I'll try it.
Hugs from France
So glad you are enjoying the tutoial. I want you all to be successful. Get busy and enjoy every minute. You will be sew sew proud of yourself and I will be sew sew proud of you too!!
I just found your blog and your FS tutorial is GREAT. I am inspired to give it a go. Love your fabric choices. What fun to be a tester!
Love your blog too! I will definitely follow.
Diane
This looks like a great tutorial - Thanks for all your hard work! I have a group of fabrics all picked out for a feathered star but have 2 stash busters to complete first! I've put you on my favorites so I can refer back! Thanks again
Hi Molly, I have always wanted to know how to do a feathered star. You have provided the means for me to learn how to do it. Thank you very much. Carolyn
Hi Molly!( I finally spelled your name right)
I love the tutorial! It is because of you and this tutorial that I will attempt the "Feathered Star"!
You ave done a great job on it and it is very inspirational.
Thanks for sharing with us and for doing the post today on Stash Manicure. Loved it!!!
Rae Ann--you are just so welcome. I should be thanking you as you have inspired me to do the tutorial.--- You and my 5 original Feathered Star students. If I inspire one person, it is worth the work. I am truly enjoying it and it helps me grow also. Your blog is fantastic and-- OHMYGOSH --growing so fast! It is just great. I am so honored that you chose to ask me to contribute. I CAN'T WAIT to see YOUR Feathered Star! YOU GO GIRL!!
I will definitely make a FS because of your tutorial. Thanks for showing us how. Jo Anna
I'm going to make one of these as soon as I am back home again. I love feathered stars but the last one I tried was not very successful. Hope this one will be better for me!
Wow, thanks so much Molly! I am going to be following along and making one of these for sure. I have always wanted to do this.
I just found my way over to your blog. LOVE it!! I especially like your FS tutorial. I took a class from Marsha and she is amazing! I will be back here again when I have some more time. I have a partially finished FS and would like to make some more as I REALLY really love this block! I may have to invest in Marsha's ruler too.
I have done a free BOM making appliqued houses called My Neighborhood. There is a link on my blog to it. It is free for now, until I get the finishing directions done that is!
Hi Molly..I have all your wonderful instructions downloaded...now I just have to have a day with NO interruptions, so I can concentrate on what I am doing...was to be last weekend, but we had a family emergency..and of course, I want my star to look as amazing as yours...thanks again..hugs LindaB (aust)
Thank you so much for your wonderful tutorial! I have found it so well explained and easy to follow. Now I just have this last step to finish and I will have my star complete. I'm really loving it.
Thanks for this tutorial; I will plan to make one, perhaps in August as I have too much on my schedule at the moment. Your post does an excellent job of breaking each part down with written descriptions as well as photos. I appreciate all the time you spent making it perfect for both styles of learners.
I'm not sure how I got to your blog, but OMG I'm so glad I found it...and saw your Feathered Star tutorial...it's just great, and I hope to be able to try it out really soon. Don't give up on us....I know tutorials take a long time to do, but you've done a fantastic job on the tutorial.....I'm off now to find all the tree steps...lol Hugs Naomi from Australia
Great tutorial... thanks for your efforts. Im so over art people who wont share. Good on you for a terrific detailed explanation that means that anyone can achieve this classically beautiful block. Im not exactly a newbie LOL but I found your explanation and tips reminded me... and taught me really helpful rules. Maretta Victoria Australia
Molly, I am making the feathered star per your instructions. Is that last triangle really a square cut 1 7/8" - where is it used?
Thanks,
Alin
Thank you, an excellent teacher. I am not perfect, thanks.
Grazie per il tutorial: l'ho caricato sul mio blog!
Molly,muchas gracias por este mágnifico tutorial,la estrella es preciosa y con tu ayuda espero hacerla muy pronto,un beso desde España,Estuve en tu precioso pais en Abril del 2010 y me encanto tu pais y su gente,un beso.
Thanks so much for this fabuolous tutorial! I made a "feather star" that was grade "F minus" and was sad to be so "bad" at it! Then, THERE WAS MOLLY! I did a few more and I think I got to at least an "A minus" (smile)... The problem for me was trying to make a "finish 8" star, (love your remarks re the 'end size'!) and wow, what a lot I learned trying to do 'dat'! Again, what a neat place Molly! You don't know how much you helped!! MonaMontana
Oh I'm so excited! I'm making a star quilt and decided I wanted to make a feathered star for the center. I didn't have a clue how to do it, but I've come across this tutorial you have did over a year ago! Thank you so much! (And you make it look so fun too!) I'm going to do make mine and then let you know how it goes. Okay?
Hi Molly, Thank you so much for doing this tutorial. I am making a quilt using this pattern for embroidered squares and adapting as I go along. Having never made one of these before, my head swims occasionally. Is this tutorial available as a pdf by any chance? Would love to be able to access it offline. Thanks again, love your site!
Thank you so much for this tutorial - it's very easy to follow and your blocks look beautiful! :)
I came to have a look after "hearing" about it on our Flickr group, some of us are trying to sew along with the Just take 2 blocks. This is a very useful tutorial, thank you.
Molly - You are my hero! Thanks so much for posting this easy to follow tutorial, it got me over my feathered star phobia. I finished my first (with your help) and I'm fired up and ready to start on another!
Hi - you have an awesome tutorial! It is very detailed and complete. I made a Feathered Star today and it was a breeze following your directions. I would love to send you a copy to post on your blog, if you want. You can view it here: http://www.facebook.com/photo.php?fbid=461734277203379
Hi Molly,
I thought you might like to know that I made the Feathered Star block into a table topper. It measures 15 x 19 inches. You can see it here: http://www.facebook.com/photo.php?fbid=462495860460554
I just finished and posted the feather star! Thanks Molly I couldn't and wouldn't have done it without you! Your instructions are the BEST!
Post a Comment